Showing posts with label Snow Front. Show all posts

Let's Get Hopping #36 One For The Boys


Hello and Welcome to another Let's Get Hopping Blog Hop, this months theme is "For The Boys" so whether you are starting your journey here or you have hopped to my blog from the very talented "Mikaela Titheridge's", I am  so happy you are here.


I was in need of Masculine Sympathy cards for my stash, like everyone, sympathy cards are not my favourite to create, but would prefer to have cards ready to go.


I have used masculine colours of Early Espresso, Crumb Cake, Soft Suede, Seaside Spray and Very Vanilla for this card. And embossing the Early Espresso card in the background with the Old World Paper 3D folder, really gave it a lot of texture.


Thank you for visiting today, I hope you have enjoyed the card, please continue the hop and see what the talented friend Rachael Merrick has created for you!


2020 Online Shoppers Code |  by Tracy Bish

When ordering, Product Suites are bundled, making ordering super easy!  With one item number, you can order the stamp/die bundle at a discounted price, plus the paper and any other coordinating products, giving you everything you need for creating perfectly coordinated projects!  I love this ordering option, and I know you will too.  Try it!!!  Just click on the above Online Shoppers Code, or any of the items in the Supply List below to go to my store.  Use this Online Shoppers Code at checkout and I will send you a special thank you for your order.  If your order is over $250, please don't use the code (you'll miss out on your own Stampin' Rewards if you use it) as you'll still receive something special in your mailbox from me.


  • Visit my online store here.
  • Shop the Clearance Rack here.
  • View the newest products available for Beginning Stampers here.
  • Join “The Inky Stampers” with me!  I love what I do and would be thrilled to have you on my team while creating, sharing and inspiring others together with you!  Do you love creating projects for others?  Do you love it all?  Would you like to save money on your stamping and/or scrapbooking supplies?  Yes?!?  Please message me for more info.You can also join my "The Inky Stampers" HERE.
  • Subscribe to my newsletter to get all the latest news and updates on what's happening and, do not worry, you can unsubscribe from it at any time - no questions asked!
  • Follow my blog  Here.

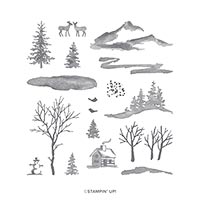
Stampin Up's "Snow Front" Card

Hello and Welcome,

Today's card has been CASEd from the Stampin Up Holiday Catalogue on page 45. It uses a scene builder stamp set, that is perfect for your wintery Christmas themes.


SNOW FRONT PHOTOPOLYMER STAMP SET

Although in the catalogue, this card is a 3 x 3" note card, I have converted it to a full size card, by popping it on a piece of thick Whisper White card base.


Making this card a very crisp and clean card, but also a quick card to pop together!


I have embellished with Toile Tidings Glitter Enamel Dots, these add a little sparkle and really bring out the card!


VIEW VIDEO TUTORIAL HERE

Thanks so much for visiting today, If you have enjoyed today's card, I would love to hear your comments.

Hope to see you back here soon,

Tracy x 


MEASUREMENTS:
Whisper White Thick card base (1/2 A4),
Whisper White card 3 x 3",
Real Red card 2 3/8 x 1/4".

SUPPLIES:

Playful Penguins Shaker Card

Hello and Welcome,

Have I told you how much I love this stamp set? I love the cute penguins images, the sentiments, and the total versatility this set has.


And I also wanted to use the new Ice Stampin Glitter and Snowfall Accents Puff Paint, and a snowy shaker card scene seemed like the perfect idea.


Have a look at the penguins chest, the Snowfall Accents Puff Paint really packs a punch and creates the best detail on the penguin. This also works really well for snow tipped mountains, snow on trees, or for frothy drinks. You will find so many reasons to use it on your Christmas Cards.


VIEW VIDEO TUTORIAL HERE

Thanks for visiting today, don't forget to hit SUBSCRIBE over on my YouTube channel, so you don't miss the next tutorial.

I hope you have enjoyed today;s tutorial, Until Next Time,

Tracy x 

MEASUREMENTS:

Pretty Peacock card base ( 1/2 A4 )
Pretty Peacock card 4 x 4 3/4",
Pool Party card 3 1/4 x 4",
Window Sheet 3 1/2 x 4",
Whisper White card 3 x 4 1/2",
Whisper White card scraps + Pool Party scraps (sentiment)

SUPPLIES:

The content found on this blog is the sole responsibility of Tracy Bish, an Independent Stampin’ Up! demonstrator, and the use of and content of the classes, services, or products offered on this website and all other Internet mediums associate with Tracy Bish is not endorsed by Stampin’ Up! Images © 1990 - 2022 Stampin' Up! Unless Otherwise Noted