Showing posts with label Let's Get Hopping. Show all posts

Let's Get Hopping # 33 "Christmas In July"


Hello and Welcome to another Blog Hop with the "Let's Get Hopping" group. Whether you have hopped here from the very talented Alicia's blog, or you are starting your journey here, I am so happy to have you visit.

The theme this month is "Christmas In July". Although we are only way half way through the year, there is no better time to start your Christmas craft then now, Christmas tends to have a way of sneeking up way too soon.


These little Christmas Trees can be used a few different ways. They make a great table decoration, place holder, or a treat holder.


These are so simple to create, I have Gold Heat Embossed 4 Trees from the "Perfectly Plaid" stamp set, and punched these out with the Pine Tree Punch.

Create a score line down both sides of your tree, this is where you will glue 3 sides together, so they will need to be scored in around the same position on each tree. 

Using the two strips that have been scored, glue these together and this will be your base for the tree. 

Snip the trunks from the trees and adhere to the base with liquid glue.

Punch a hole in the tree what will open and the middle of the three trees that are glued together.

Die Cut two stars from the Stitched Stars Die using Gold Foil. I have glued the two together at the top with a glue dot, and used liquid glue to adhere to the opening tree.

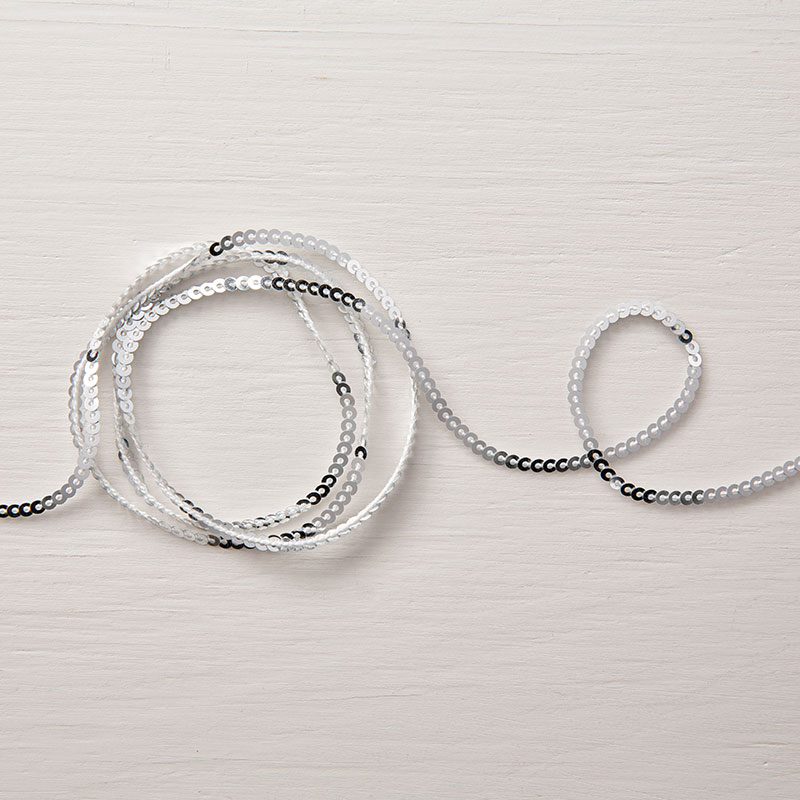
Lastly the tree is held together with the Gold Twine from the Forever Greenery Trim Combo.


The colours I have used are Shaded Spruce, Old Olive, Granny Apple Green, Pear Pizzazz, and Garden Green.

I hope you have enjoyed my project today,to continue the hop and see what Mikaela Titheridge has created, please click on the link below.


Until Next Time,

Tracy x 


MEASUREMENTS:
Card - 6 x 2 1/4" (Trees,
Card - 1 1/2 x 1" (scored @ 1/4 each end)
Card - 1 1/2 x 7/8" (scored @ 1/4" each end),
Gold Foil - 1 3/8 x 2 1/2".

SUPPLIES:

Let's Get Hopping #29

Hello and Welcome to another Blog Hop with the "Let's Get Hopping" group. Whether you have hopped here from my Talented Friend Nina's blog, or you are starting your journey here, I am so happy to have you visit.


The theme this month is "For The Kids"!


This months theme has a very wide scope, and my mind went in so many directions. But, one thing I love to do is create a gift set of cards. And for any new parent, the best gift is a pack of "Thank You" cards.


This box measures 3 1/8 x 2 x 3 1/8" and fits 8 (2 each of 4 designs) 3 x 3" cards, and envelopes. 


There is many stamp sets that can be used for these type of cards, but I have used the "Wildly Happy" stamp set that can be found on page 101 of the Stampin Up Annual Catalogue.


These 3 x 3" cards are very simple designed, with the  background on "Parisian Blossoms" Specialty Designer Series Paper.


Image stamped on Thick Whisper White card, and a light wash of Pool Party ink.


The sentiment ( Well Said Stamp Set )has been stamped onto Whisper White card with Memento ink, and a little highlight of Pool Party card attached below. The Pool Party card has been die cut with the Stitch die from the Stitched Labels Die set.


Lastly a little bow made from Whisper White Bakers Twine, to finish off each card.

These are so simple, but is such a thoughtful gift. I hope that you may create these in future for a new family.

Thank you for visiting today, I would love if you could leave me a comment. Next up on the hop is the very talented                 .

Enjoy Your Day!

Tracy x


MEASUREMENTS:
Thick Whisper White card 3 x 6",
Parisian Blossoms DSP 3 x 3,
Whisper White card 2 3/4 x 2 3/4",
Whisper White card 2 3/4 x 1/2",
Pool Party card 2 3/4 x 1/2",
Pool Part card 1 3/4 x 2".

SUPPLIES: 

Lets Get Hopping 28

No photo description available.

Hello and Welcome to another Blog Hop with the "Let's Get Hopping" group. Whether you have hopped here from Alicia's blog, or you are starting your journey here, I am so happy to have you visit.
The theme this month is "Shaker Cards"!


Today's card is using a Host set from the Mini Catalogue called "Make A Splash" This stamp set can be earned for FREE with a $250 order or by having a Party with sales of $250.


I love this stamp set, and I knew it would be perfect as a Shaker card, especially with these blue beads to give the look of bubbles in the water.


This shaker card was designed to be a See - Through Shaker card, that opens up to a fish bowl inside.


To create card, 
1. Stamp fish bowl onto Balmy Blue matting card, and foam piece, and Whisper White card, fussy cut  all images, including the middle of the bowl. 
2. Layer matting over Thick Whisper White card base, trace image with a pencil, and fussy cut. 
3. Emboss Balmy Blue layer with Mosaic 3D folder.
4. Stamp 3 fish with Pumpkin Pie ink, fussy cutting these images.
5. Stamp 4 reeds with Call Me Clover ink, fussy cutting these images, and glue two together, so both sides cam be shown through the fishbowl.


 6. Adhere with Tear N Tape one Window Sheet to top of card base, and one to the back of the Balmy Blue matting.
7. Attach two fish to strips of window sheet, adhere to the back of matting, and reeds to the base of the fishbowl as well.


 8.Glue foam piece to the back of Balmy Blue matting.
9.Place Foam Adhesive Strips around  the edge of the matting, and fishbowl, add beads, and adhere the second window sheet over the top.
10.Adhere matting to card base. 

11. Stamp reeds with Call Me Clover ink to the blue fishbowl, that was fussy cut earlier, glue in the 3rd fish. This piece will also be glued to the inside of the card.
12. Stamp sentiment with Pumpkin Pie ink, onto Whisper White card, glue to Call Me Clover card, and adhere to card.


Thank you for visiting my blog today, next up on the blog hop is the talented Mikaela Titheridge. I would love for you to leave a comment, and hope you will come back for a visit soon.

Until Next time,

Tracy x 


MEASUREMENTS:
Whisper White Thick card base ( 1/2 A4 ),
Balmy Blue card 5 5/8 x 3 3/4",
Whisper White card 5 5/8 x 3 3/4",
Window Sheets 2 Qty - 4 x 3 1/4",
Call Me Clover card 2 1/8 x 5/8".

SUPPLIES:

Let's Get Hopping # 27 "New Beginnings"


Hello and Welcome to the first "Let's Get Hopping" Blog hop for 2020, whether you have arrived from Mikaela's blog or you are starting your journey here, I am so happy to have you visit today!


Today's blog hop theme is "New Beginnings", and even though I have decided on card, I still love bright and happy colours.


With so many great goodies in the Mini and Sale A Brations Catalogues, it was a little hard to choose what sort of card to create and what new set to use, but the Birthday Bonanza Suite is so cute, and I have been so excited to put ink to these stamps.


Not a typical Baby card, but I don't think cards always need to be pastel, and the Toucan is too cute in this set. The colour combo used today is Pumpkin Pie, Bermuda Bay, and Smoky Slate. 

I have also used a few items from the Mini and Sale A Bration catalogues, Bonanza Buddies Bundle, Petal Pink Metallic Edge Ribbon, Metallic Bakers Twine and Sequins Combo.

Thank you for visiting today, I hope you have enjoyed this card, please feel free to leave me a comment, next on the hop is the very talented Teresa Brown, to go to her blog please click the arrow below.                 .

Have a Wonderful Day,

Tracy x 


MEASUREMENTS:
Pumpkin Pie card base ( 1/2 A4 ),
Watercolor 100 2 1/2 x 4",
Whisper White card 2 1/8 x 2",
Bermuda Bay card 4 x 1 1/2",
Watercolor 100 1 1/2 x 1 1/2".

SUPPLIES:

Let's Get Hopping #25

cover photo, Image may contain: text


Hello and Welcome to  the "Let's Get Hopping" blog hop for October. This month's theme is a "Single Layer Card". And I can't wait to see what everyone has created. So if you have joined in from my Talented Friend Nina McMillan's blog or starting your journey here, thanks so much for visiting!


I am so excited to show so many Halloween projects for the whole month of October, it has been a lot of fun, I wanted to tie in with this blog hop too.


Although not technically a single layer card, I am being a little cheeky as its only a few tiny leaves (hahahaha) The Technique used is a Masking technique, to see how I have created this card, please see the video tutorial.


VIDEO TUTORIAL AVAILABLE NOW

Thanks so much for hopping today, I hope you have enjoyed today's card, next on the hop is the very talented Alicia, I can't wait to see what she has created.


No photo description available.


MEASUREMENTS:

Thick Whisper White card base ( 1/2 A4 ),
Scrap card to create mask,
Scrap Old Olive card for leaves.

SUPPLIES:


Let's Get Hopping # 24

cover photo, Image may contain: text

Hello and Welcome,

The Let's Get Hopping group are together again, and this month's theme is "CASEing the Catalaogue". If you are starting your journey here or you have hopped here from the amazing Mikaela Titheridge's blog I am so happy to have you here.


My card has been CASEd from the Holiday Catalogue and the "Let It Snow Suite" on page 18. I have taken this simple layout, and I just had to use my New favourite stamp set "Playful Penguins".


The Designer Series Paper in the background is the "Brightly Gleaming" specialty paper, and has the sparkliest copper stars.


Now to draw your eye to these gorgeous penguins, their snowy chests are created with the Snowy Accents Puff Paint, this can be found on page 19. It is easy to use and creates a really nice effect.


Thanks for popping in today, next up on the blog hop is Alicia Yap  please click on the link, to go to her blog. If you have enjoyed my card I would love if you could leave a comment.

Until Next time,

Tracy x 


No photo description available.


MEASUREMENTS:
Thick Whisper White card base (1/2 A4)
Brightly Gleaming DSP 5 3/4 x 4",
Whisper White card 4 1/2 x 3",
Copper Foil 2 qty 3 x 1/2",
Night Of Navy card 3 5/8 x 3/8",
Thick Whisper White card 5 x 3"

SUPPLIES:

Let's Get Hopping #18 "Case Yourself"


Hello and Welcome, whether you are starting your hop here or have arrived from Mikaela's blog, I am so happy to have you visit.

Today I am taking part in a blog hop with the "Let's Get Hopping" team, this month's theme is "CASE Yourself", so we are going to revisit a blog post from almost a year ago.

Sticking to a blog post within this group, I am going to be taking you back to Round #9 (A Set Of Cards) that went live on 3/5/18.


Although these are 3 x 3" cards, I have decided to stick to normal size cards and use the Acetate Card Box to package the set instead.

So I think I have kept you long enough,here is what I created!


Cards are made using the "Piece Of Cake" stamp set, and are a great example of #Simplestamping,
using stamps, ink and paper.


Also used  for this card set is my favourite colour family "Brights" which just make the happiest cards.

Technique used for these cards is "Masking", where the cakes have been stamped, then masked so further stamping can be down over the top, and sponged. Leaving a nice crisp white cake image.


Packaging is made so easy with Stampin Up's Acetate Card Boxes, with a little belly band of Whisper White card, and DSP ( I used the Brights 6 x 6" DSP )


I am so pleased how the topper for my box turned out, with a little Whisper White and Coastal Cabana cut out with the Layering Circle Framelits as the main piece. 

The cake stand has been punched with silver foil, cake has been stamped with Granny Apple Green ink onto Whisper White card. The heart decoration for the cake has been stamped with Granny Apple Green ink onto Granny Apple Green card, and a little glitter added. 

Lastly adding a little embellishment with the Coastal Cabana / Granny Apple Green Reversible Ribbon & Mini Silver Sequin Trim.

VIEW VIDEO TUTORIAL HERE

Thank you so much for visiting, next on the hop is the talented Linda Handford, I can't wait to see what she has created.

Have a lovely day!

Tracy x 


MEASUREMENTS:

Whisper White card base )1/2 A4),
Brights card 4 x 5 3/4" 
Whisper White card 3 7/8 x 5 5/8".

SUPPLIES:

Piece Of Cake Photopolymer BundleWhisper White A4 CardstockBrights Classic Stampin' Pad AssortmentBrights A4 CardstockBrights 6" x 6" (15.2 x 15.2 cm) Designer Series PaperLayering Circle Framelits DiesStamping SpongesCoastal Cabana/Granny Apple Green 3/8" (1 Cm) Reversible RibbonSilver Mini Sequin TrimAcetate Card Boxes (C6)Silver Foil Sheets


The content found on this blog is the sole responsibility of Tracy Bish, an Independent Stampin’ Up! demonstrator, and the use of and content of the classes, services, or products offered on this website and all other Internet mediums associate with Tracy Bish is not endorsed by Stampin’ Up! Images © 1990 - 2022 Stampin' Up! Unless Otherwise Noted